Implement the Twenga Pixel via Google Tag Manager
Gesamtansicht
Steps to implement the Twenga Pixel via Google Tag Manager:- Set the Data Layer variables
- Supply the Data Layer
- Install the Twenga Pixel tag
- Setup Triggers
Set the Data Layer variables
The Twenga Pixel tag needs to collect information related to tracked events (order confirmation, product display), this information must be stored in data layer variables so that the tag is able to access it.
In your Google Tag Manager, in the "Variables" tab, please check that there are data layer variables for the following information, by type of event:
-
- Order confirmation
- Order ID
- List of articles of the order
- The attribution weight of the order (optional)
-
Product display
- Product reference
- Product price
- Product variant ID (optional)
For each of these information which is not already stocked in a Data Layer variable, you will need to create a new variable:
- ‘Data Layer’ type
- With a name of your choice, representing its content
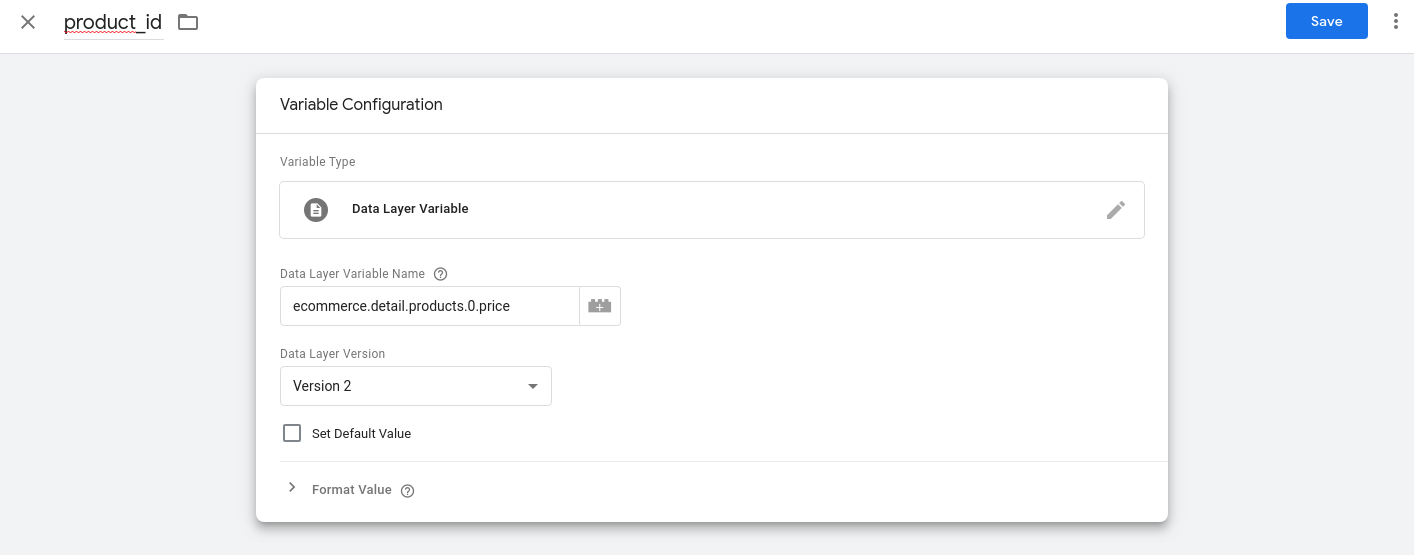
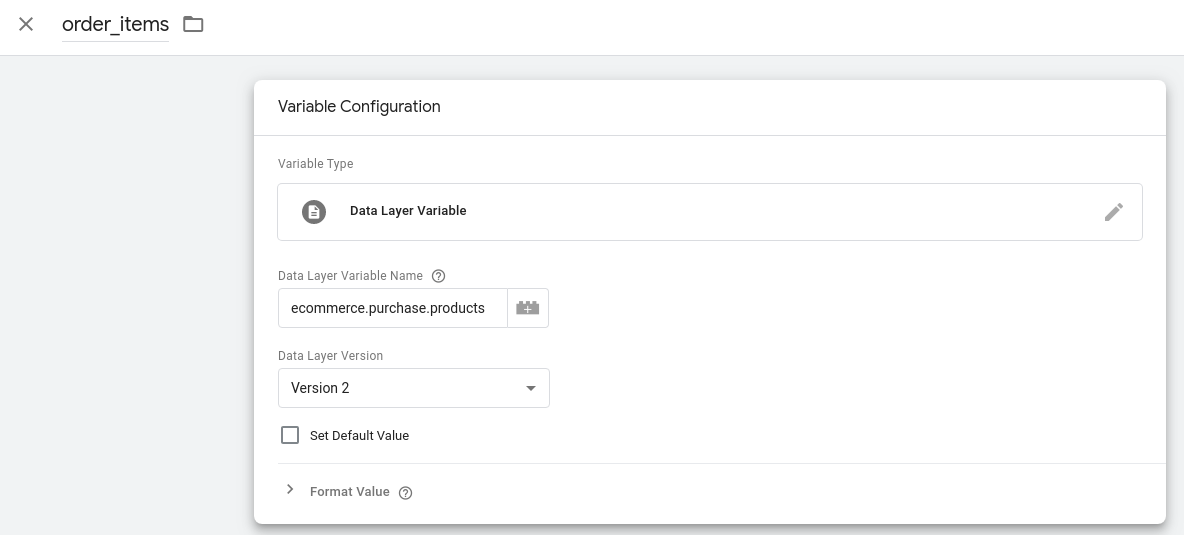
- With as its value, a Data Layer attribute, while using the notation type ‘object.element.attribute’. Where the attribute corresponds to a Data Layer variable.
- Do not modify the rest of the settings
Here below, a Data Layer variable example for the reference product::
Another example, this time for the Data Layer variable containing the items of an order::
Map or Update Data Layer
This step is only required if the new Data Layer variables were created at the previous step.
When a tracking event occurs, the Data Layer must be supplied with the information linked to the event.It must be done via Javascript code that we will call ‘Data Layer script’ which must be performed on every page where the tracking must be installed (product pages and/or transaction confirmation pages).
The Data Layer script must be placed <strong>ABOVE</strong> the Google Tag Manager tag in your pages => Google Tag Manager documentation
Product page
Here is an example of a Data Layer script for the product page:
window.dataLayer = window.dataLayer || [];
dataLayer.push({
	"ecommerce": {
		"detail": {
			"products": [{
				"id": document.getElementById("product_info").getAttribute('data-id'),
				"price": document.getElementById("product_info").getAttribute('data-price')
			}]
		}
	}
});
The script collects the information in the page and ‘pushes’ them into the appropriate Data Layer variables.
Please note, this is only an example, you must adapt this script according to the structure of your product page.
Order confirmation
Here below, a Data Layer script example on the order confirmation page:
window.dataLayer = window.dataLayer || [];
var aCollectedItems = [];
var aItems = document.getElementsByClassName("item");
for (var i = aItems.length - 1; i >= 0; i--)
{
    aCollectedItems.push({
        'id': aItems[i].dataset.id,
        'variant_id': aItems[i].dataset.variant_id,
        'quantity': aItems[i].dataset.qty,
        'price': aItems[i].dataset.price
    });
}
dataLayer.push({
'ecommerce': {
    'purchase': {
      'actionField': {
        'id': document.getElementById("order_info").getAttribute('data-order_id')
      },
      'products': aCollectedItems
    }
  }
});
The script collects the information in the page and ‘pushes’ them into the appropriate Data Layer variables.
Please note that the script constructs a list of articles ‘aCollectedItems’ and for each article from this list, it fills in the following attributes: ‘id’, ‘price’, ‘quantity’ and ‘variant_id’ (this attribute is optional), it will be necessary to refer to these attribute names when installing the Twenga Pixel.
Please note, this is only an example, you must adapt this script according to the structure of your order confirmation page.
Install the Twenga Pixel tag
In your Google Tag Manager interface, in the ‘Templates"’ section, look for the "Twenga Pixel" tag template in the gallery and add it to the workspace. From this template, you must create a tag for each type of event: Product page and Order confirmation. The setting of the configuration fields is to be carried out only once for all the requested parameters; the settings of the product page as well as the settings of the transaction page. Only the triggers differentiate the two tags to deploy.
‘Product page’ tag:
In your Google Tag Manager, in the tab ‘Tags’ then ‘New’, click on ‘Tag configuration’, Look for our ‘Twenga Pixel’ which should figure in the list of tag models and click on ‘Add to workspace’.Rename the tag ‘Twenga_product’.
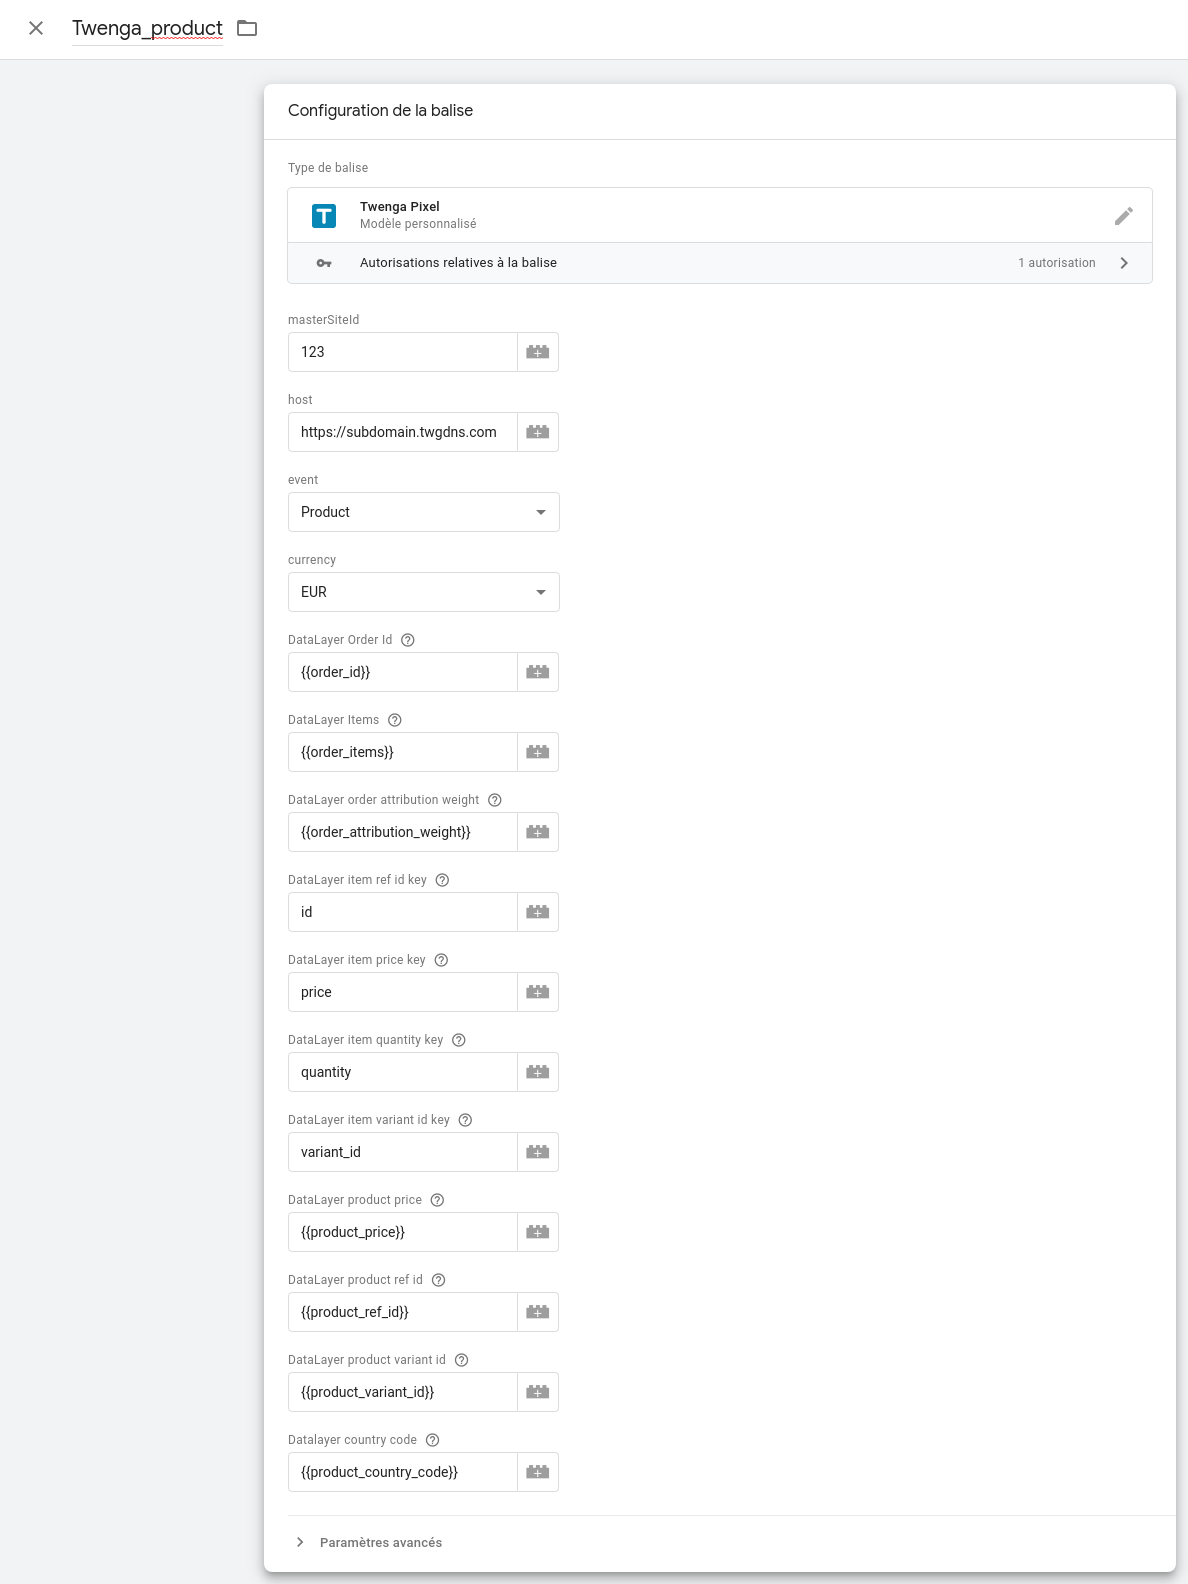
You can now complete the tag configuration fields as follows:
Please note: The ‘references’ to the Data Layer variables are accessible via the button located next to the tag configuration input field. This functionality makes it possible to list the available variables and when selected, the reference to the variable will be automatically added to the input field in the form ‘{{name_of_variable}}’.
- master_site_id : This is your Twenga client's identifier. Ask your Account Manager to get your client identifier number.
- host : This is the tracker's web host, to which tracked events will be sent. Ask your Account Manager to get your tracking host name.
- event : The event type tracked by the tag. Select ‘Product’.
- currency : You can either set a currency which will be used for all tracked events, or you can map this field to an existing Data Layer variable in your Google Tag Manager that already contains the currency to be tracked. Please be sure that currency is set in ISO 4217 currency code.
- country_code : You can map this field to an existing Data Layer variable in your Google Tag Manager that already contains the country code to be tracked. Please be sure that country is set in ISO ISO 3166-1 alpha-2 country code. Ex: FR
- order_id : Reference to the Data Layer variable containing the order ID. Click on the button to the right of the input field, a window lists the Data Layer variables to which you can refer to. Select the variable containing the order ID. If we take the example given in the step ‘Define the Data Layer variables’, you can select ‘order_id’, this will automatically enter the value ‘{{order_id}}’ in the input field.
- order_items : Reference to the Data Layer variable containing the list of items in the order. Click on the button located to the right of the input field, a window lists the data layer variables to which you can refer to. Select the variable containing the list of order items. If we take the example given in the step 'Define the Data Layer variables', you can select 'order_items', this will automatically enter the value '{{order_items}}' in the input field.
- order_attribution_weight : Reference to the Data Layer variable containing the attribution weight of the order. This information is optional. Click on the button to the right of the input field, a window lists the Data Layer variables to which you can refer to. Select the variable containing the attribution weight.
- item_ref_id_key : Name of the item attribute containing the item reference (as defined when supplying the Data Layer). If we take the example given in the step ‘Supplying the Data Layer’, you can enter ‘id’.
- item_price_key : Name of the item attribute containing the item price (as defined when supplying the Data Layer). If we take the example given in the step ‘Supplying the Data Layer’, you can enter ‘price’.
- item_quantity_key : Name of the item attribute containing the item quantity (as defined when supplying the Data Layer). If we take the example given in the step ‘Supplying the Data Layer’, you can enter ‘quantity’.
- item_variant_id_key : Name of the item attribute containing the item variant ID (as defined when supplying the Data Layer). This information is optional.
- product_price : Reference to the Data Layer variable containing the price of a product. Click on the button to the right of the input field, a window lists the Data Layer variables to which you can refer to. Select the variable containing the price of the product. If we take the example given in the step ‘Defining the Data Layer variables’, you can select ‘product_price’, this will automatically enter the value ‘{{product_price}}’ in the input field.
- product_ref_id : Reference to the Data Layer variable containing the reference of a product. Click on the button to the right of the input field, a window lists the Data Layer variables to which you can refer to. Select the variable containing the reference of the product. If we take the example given in the step ‘Defining the Data Layer variables’, you can select ‘product_id’, this will automatically enter the value ‘{{product_id}}’ in the input field.
- product_variant_id : Reference to the Data Layer variable containing the variant ID of a product. This information is optional. Click on the button to the right of the input field, a window lists the Data Layer variables to which you can refer to. Select the variable containing the product reference.
Example tag configuration for the product page:
Page Tag ‘transaction’ or ‘order confirmation’:
In your Google Tag Manager, in the 'Tags' tab click on the tag that you created in the previous step, in the drop-down menu (located to the right of the ‘Save’ button) click on ‘Copy’. Rename the tag to ‘Twenga_transaction’. Modify the ‘event’ field by selecting ‘Transaction’.
Setup Triggers
Each tag should be associated with a trigger, depending on the type of event it is meant to be tracking.
Produkt
The Twenga Pixel tag for product display events should be executed on any product page display. Our first suggestion is as follow.
- In your Google Tag Manager, go to 'Triggers" > New' click on 'Configure Trigger'
- In the list of trigger types, under 'Page view', select 'DOM Ready'.
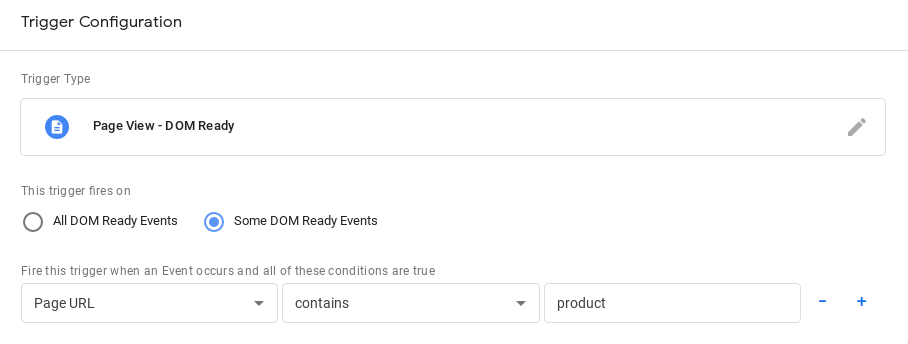
- Configure the trigger by switching the 'This trigger fires on' parameter to 'Some DOM Ready Events'. An inline form should appear, containing 3 inputs:
- In the first drop down list, select 'Page URL'.
- In the second list, select 'contains'.
- In the last field, specify a string of characters that is always present in the product page URLs. Note that you should specify a string that only appears in product page URLs in order to avoid firing the Twenga Pixel tag on inappropriate pages.
Alternatively, there might be an already existing Data Layer variable that contains the type of the current page. If this is the case, you might create a trigger as follow:
- In your Google Tag Manager, go to 'Triggers' > New, click on 'Configure Trigger'.
- In the list of trigger types, under 'Page view', select 'DOM Ready'.
- Configure the trigger by switching the 'This trigger fires on' parameter to 'Some DOM Ready Events'. An inline form should appear, containing 3 inputs:
- In the first drop down list, select the Data Layer variable that contains the current page type.
- In the second list, select 'equals'.
- In the last field, specify the expected value of the 'page type' Data Layer variable for the product page.
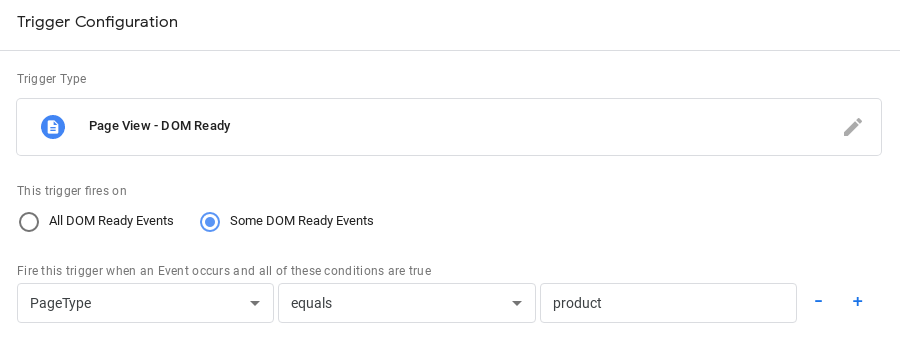
You might very well use an existing trigger that is already configured to fire on the product page and associate it to the Twenga Pixel tag.
Transaction confirmation
The Twenga Pixel for transaction confirmation events tag should be executed when a transaction has been completed.
We suggest creating this trigger the same way you created the one for product displays. Simply specify a string that appears in the transaction confirmation page's URL or the expected value of the 'page type' Data Layer variable for the transaction confirmation page.